Monday, September 26, 2011

Kitchen Island

I've been looking for a "bean and seed" counter to use as a peninsula in our kitchen when we redo it...one day.  So far, all of the ones I've found have been a minor fortune...at least for my budget.  An example of the loveliness to which I refer:


Obviously, this one is much longer than what we would need...but you get the idea.  And I want to put it...


in place of this counter with the curved shelves on the end.  Neat-o, huh?

All of the counters I've found so far cost thousands.  Not.in.the.budget.  So, when I was at an estate sale a couple of weeks ago, I found this...for $75 (please pardon the poor photo - it's currently sitting on its side in my still-unpacked garage)


It was in an old barn for a long, long time, but I love the wood handles and the metal tag-holders (not sure of correct name for those) and for the most part, the paint.


I'm love the chippiness and worn away areas, but not too fond of the red spray paint.  I haven't had a chance to see if I can sand away to spray paint and get a more consistent finish. I know if I keep the chippy look, I'll have to seal it so my daughter doesn't eat it.  If saving the current finish doesn't work, I'm planning to just sand the whole thing and re - paint it.  It needs a new top - I'm thinking butcher block....what do you think?  What would you do (please don't say, "throw it in the trash.")?

I need some advice on this one, so any you have to offer will be greatly appreciated!

I'm linking this to
<br/>http://www.thethriftyhome.com

Thanks and take care -

Thursday, September 22, 2011

Free for (F)all Decor

Like many people, autumn has always been my favorite time of year.  The colors, the smell, football, the crisp air...living in Ohio, we get the whole fall experience.  I was outside with the kids this afternoon, and played around some fall-ish decor ideas from stuff I found in our yard or garage.


Very simple - just an overturned wooden box with white candles scattered on top.  I think you could do 1 candle or 30....I'd just be sure to use varying heights and sit them on overturned cups (or something similar) to give more dimension beyond short and tall pillars.


Not really your typical fall arrangements, but it might inspire other ideas?  What's your favorite season and why?

Linking to

The Shabby Creek Cottage
HookingupwithHoH

Somewhat Simple

Weekend Bloggy Reading
The Shabby Nest

Boogieboard Cottage

Photobucket


take care -


Wednesday, September 21, 2011

Design Style - Farmhouse vs. Cottage

Metal, wood, natural fibers, chippy paint, rust, old stuff...these are a few of my favorite things.  I have always associated these items with cottage style, but today I came across a blog, LaurieAnna's Vintage Home, that made me rethink the classification of my  tastes.  Described as "Simple Farmhouse Living," a look through LaurieAnna's blog made me think, "farmhouse...farmhouse....yes, that's it, farmhouse!"  I love it! 


[caption id="" align="aligncenter" width="400" caption="A display in LaurieAnna's Shoppe using an old camper she found on Craigslist.  Gorgeous! "][/caption]

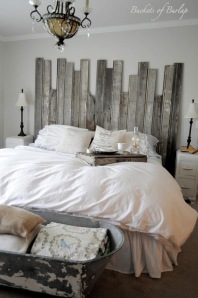
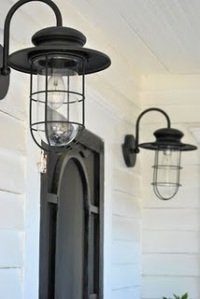
I realize that style need not carry a title, but I'd always liked the cottage look, but I also love industrial items....and when I think about cottage+industrial = farm.  Right?   Charming porches with barn-style lighting.  Cozy dens with old barn-siding floors.  Bedrooms with chippy, rusted metal chests. 


 Farmhouse Barn door for bathroom - at thestir.cafemom.com


[caption id="" align="aligncenter" width="424" caption="Buckets of Burlap bedroom using barn siding and a cowboy tub."][/caption]


[caption id="" align="aligncenter" width="387" caption="Bookshelf made from wood crates/pallets"][/caption]


[caption id="" align="alignnone" width="360" caption="Beautiful farm-style cabinet used for kitchen sink"][/caption]


 barnhousebh.com


[caption id="" align="aligncenter" width="360" caption="Barn Style Bathroom from nskwood.net Rustic Cabinet as shown in Country Living"][/caption]


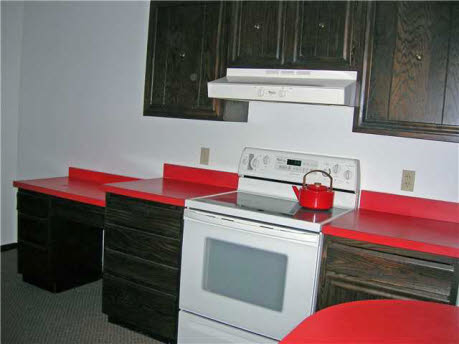
So I live in a retro 70s ranch-style home that has red formica countertops and brown carpet in the kitchen.  Not screaming fashionable farmhouse.


[caption id="attachment_31" align="aligncenter" width="459" caption="You know you're jealous...we do appreciate the sellers leaving us the matching tea kettle.I can't WAIT to tackle this badboy!"][/caption]

Does this peak your interest to see more of my beautiful new home?  Well, it just so happens that I did a whole post showcasing it in all her glory!


I'm so excited to start on my next project with all these fantastical (I know it's not a word) farmhouse fun in mind!!


  I have a BUNCH of farmhouse-y and industrial chic purchases that I've made recently that I need to photograph and share....so I'll get on that as soon as I can find a way to occupy my kids for 10 minutes....and when I can forge a path to that part of my garage!


I definitely suggest checking out LaurieAnna's beautiful blog and shoppe


I'd love to hear your ideas about style and design. 


take care -


Monday, September 19, 2011

Cheerios!

I can usually squeeze a few minutes of "free" time (to load the dish washer, make bottles, pee) by giving Emme a couple Cheerios to play with after breakfast.  A couple of weeks ago, I was trying to get dressed, so I gave her the Cheerios and then handed Max the box because he was acting like he wanted to look at it.  Usually, he's very good about keeping food inside its box, but he decided that Emme needed more than I had given her.

He's such a sweet boy to help me out...


And Scarlet, the pug (black blob in lower left corner), helping me clean them up...


Hopefully, you weren't expecting a cool cheerio craft to redeem last week's flop.  Sorry to disappoint.  It was a great morning at my house, how was yours?  Cheers!!

take care -


Friday, September 16, 2011

My attempt and failure at Missoni-ing...

Didn't somebody famous once say something about the only failure is in not trying?  Yeah, well, I tried, and I'd still have to call the result a failure.

So I saw these beautiful Missoni pillows on the Target website, but I'm not much of a seamstress, so I thought I'd try the same technique on cardboard...with a glue gun.
There's also one in shades of purple that I love too.  Okay, so in my defense, the nearest craft store is about 40 minutes away--and craft store + toddler = chaos.  It's been a rough week because Emme's been teething and has been getting up several times a night.  My husband is on 3rd shift, so he's basically absent....I have no idea how single moms do it!!! 

Back to my craft fail - if I had the opportunity to go choose my own felt colors specifically for this project, I think it would have turned out somewhat better.   However, I just had a couple scrap pieces from trying to make felt flowers a couple months ago.

So without further delay, here she is....

If I had the time and patience and materials to do it again, I think it would turn out better overall....but I'm still not sure that this look is meant for anything but a pillow.  Wall hangings....not so much.  

I hope this has given you a feeling of joy and achievement as I'm sure any project you've completed recently MUST be better than this (I read an article on how to be a happy mom yesterday, and she mentioned that moms spend too much time comparing themselves....it's okay, I'm fine with this failure)

Have you had a complete craft fail?  Please share the juicy details!

If by some crazy chance that this idea ran through your mind, I want to spare you the burnt fingers from the hot glue gun...so I've linked this post to:


Take Care and have a great weekend -

e

Thursday, September 15, 2011

Max's Big Boy Bedroom - Part 1

My goal is to have Max in his own room sometime before he enters high school.  At the rate his room redo is going....I may need to up that to college.  He's outgrown the crib-- though our babies were born at a" normal" size (Max 7.7lbs and Emme 8.7lbs) - they quickly zoomed up the growth charts and are both in the 97%+ percentile for height and weight.   So....needless to say, Max just skipped over the toddler bed (bummer, because IKEA has some really cute ones!) and we're putting him in a full-sized bed.

His new room is the only one in the house (THANK GOODNESS!) that has (or, had) wallpaper, and I dreaded removing it.  I thought we'd surely have to re-drywall.  Fortunately, the previous owners painted with semi-gloss paint before they papered, so removing it only took a day.  Still, not something I want to do again in the near future.  This experience has also made me rethink my plan to paper my dining room. 


Just starting to strip wallpaper

 Unfortunately, the shiny, burgundy, puffy curtains (stuffed with plastic grocery bags for extra "puff") do not fit in with the overall "look" that I'm going for....hopefully, I can find another place to use them (like in my fireplace).  The blue carpet will also be leaving us one day...the sooner, the better.


Max "helping" me strip wall paper


[caption id="" align="aligncenter" width="300" caption="Mid-strip....a lot of the backing had to be removed with water and a putty knife."][/caption]

 Once I finished with the paper-removal, I washed the walls down twice with hot soapy water.   The 2 walls you can't see are painted navy blue with just the border around the top.  Between the navy paint, the dark wood and any wall paper glue remnants, I decided I'd have to prime the walls.   (I am very impatient and tend to cut corners when possible...bad me) 


So now the fun part finally begins.

Max loves cars, trucks, anything on wheels.  He loves the Cars movie, but I'm not huge on character stuff - so while I still have some control over things, I decided on a general car theme.


 I started with these decals from Roommates:


And then this quilt from Target:


I don't believe that Target is making  this line any longer, it's currently on clearance at my local Target - I think I paid about $50 for the quilt and 2 shams.  I found that the Roommates decals I liked were also sold at Target....so yippee for easy shopping!!  They also had a line of decals available that went with this design, which were also on clearance. 


So, I painted the room a lighter shade of the blue in the quilt...

Already much better than the "before."


The next step was adding the "road" border.  The Target decals came with some road pieces, so I used a level and the "road curve" from the Target set.  It just so happened that the level I used was almost the same width as the curved road decal (approx 2" wide).  Basically, I used the level for all horizontal and vertical roads, and for all curves, circles, I traced the curved road decal. 

The decal I traced is on the left, and I traced both sides of the level for the straight parts of the "road".


Since I painted the walls with a satin finish, I chose to do the road in a matte finish  -  I just mixed some white and black paint to make a light gray color.  I had planned to tape off the edges of the road to make the edges sharp, but being my impatient self, I just took a 1" brush and went to it.  It probably would have been a little easier in the corners and curves to use a smaller brush, but I didn't feel like looking for one in our mess of unpacked boxes.


[caption id="attachment_252" align="aligncenter" width="300" caption="Bed "headboard" - before painting road dashes  "][/caption]

 Bryan and I couldn't find a headboard that we liked that we also felt wasn't dangerous or could be used a climbing apparatus...so I decided to paint one on the wall.  Obviously (and hopefully it looks like), Max's name. 


Once I finished painting the road, I did the dashes.  I thought and thought about a consistent way of doing this that wouldn't take weeks...I even bought yellow duct tape with the thought of  cutting dashes and sticking them onto the wall...but I was worried they would peel off and Emme would try to eat them.  I tried tracing over the decal, but that also was very time-consuming and didn't really work.  Finally, at around 10pm, I decided to just go for it and freehand.  I practiced a couple different strokes trying to find one I could easily repeat, then wiped off with a wet rag and started with my chosen "method".  The dashes aren't perfect by any means...but it only took about 45 mins to do it this way, and I thought the imperfection gave it a more "cartoonish" look.


[caption id="attachment_255" align="aligncenter" width="300" caption=""Road" with dashes"][/caption]


Then I added the decals.  The instructions say to allow the paint to cure for several weeks before applying the decals....but that didn't really work with my schedule, so again, I went for it and started sticking....this was fun!!


[caption id="attachment_245" align="aligncenter" width="300" caption="Closet doors"][/caption]


[caption id="attachment_253" align="aligncenter" width="300" caption="Max "headboard""][/caption]


So, the walls are done.  Now I need to add all of the finishing touches (like a bed would be nice)....and I'll post the results as soon as I can.

 Any fun kid room projects in your future?  Please share ! (I still have a girl's room to do!!)


I've linked this post to:


Tip Junkie handmade projects

Blue Cricket Design
Thanks -

e


Tuesday, September 13, 2011

Inspiration vs. Reality

I have a 2-year-old son and a 10-month old daughter (15 months apart) and I'm a SAHM...so the extent of my "alone time" amounts to the 10 minute shower I might get every-other-day.  When I get ideas, they are typically a fleeting thought jumbled between screaming babies, dirty diapers, and doing laundry.  I've started to note them in my phone so I don't forget them when I actually have time to act on them one day (18+ years from now?  Sometimes I wonder.) 


This is why I LOVE pinterest - it's a place to store ideas and inspirations....and with the handy-dandy favorite's button, it's super-easy to grab an idea, make a bottle, and put a kid to bed at the same time (I joke).  I just hope I have some time soon to share some of my own ideas.  My son's room should be done in a couple of days. 


This post has actually taken me several hours to write, so you can imagine how much time I'm able to devote to redoing a bedroom!!  Pinterest allows an escape to a land of white couches and toyless living rooms....things that are far from my reality.


This is my first attempt to link to another website - so I'm keeping my fingers crossed that it works.


Thanks -

erin

Home, tooth, snake...oh my!

FINALLY - we are connected to the outside world again.  I thought this day might never come.  Apparently, September is a very popular moving time...which makes sense....but still doesn't make waiting for cable and internet for over a week any easier!

We had a snake visitor our 3rd night in the house...hiding behind the piano.  Luckily, Bryan isn't afraid of snakes (like he is bats) and was able to scare it out of the house.  It was a baby water snake...but still not a welcome visitor. 

Emme's first tooth (bottom left) peeked through a day after her 10-month birthday (September 7th).  She also started crawling in the last week (right now she is unfolding all of my clean newly folded laundry)...she uses a knee/foot method. 

Anyway, we are in the new house and Max's room is almost finished...I'm going to do a whole post about it and how I did everything...once it's done.  Next up will be Emme's bedroom....and then...dun dun duuuuuuun...the retro-esque kitchen!

I need to save what's left of my laundry from the clutches of my now-mobile 10-month old...so that's all for now.  I have a lot of catching up to do!!
Related Posts Plugin for WordPress, Blogger...