Wednesday, February 29, 2012

A Tisket, A Tasket - Some Pretty Painted Baskets

The past couple days have been pretty warm for February in Ohio...which has inspired me to look towards spring, even though it's completely possible that there will be 5" of snow on the ground at this time next month.

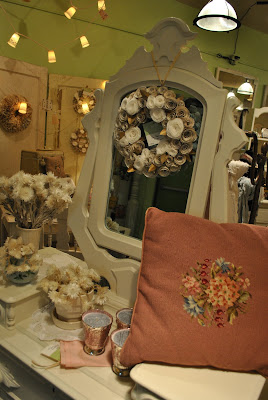
Due to wreath-making and medical emergencies,  my booth (and my blog, and my house, and the laundry, and...) has been sadly neglected for the past couple weeks.  In order to gussy up my booth space for Spring, I forced myself to stop making wreaths for 2 days so I could  focus on it.


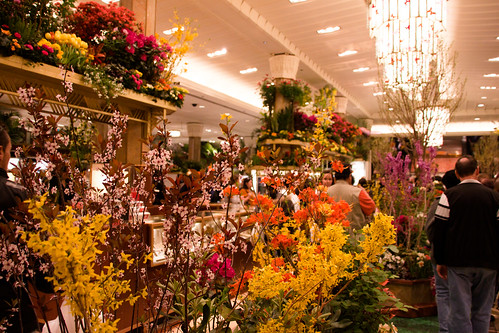
I had a vision in my mind of a flower-filled wonderland - ever been to Macy's in New York City in the Spring?


I quickly realized that 2 days with 2 toddlers and a $5 budget narrows my decor options.


One project I wanted to try was making some little vintage-ish Easter / Spring baskets.  I found a couple around the house and a bunch at the thrift store.


After running out of spray paint before making it through my first coat (I'm not patient enough for successful spray painting anyway), I slapped a couple coats of off-white latex satin paint on the baskets.


 I was going to stop there, to keep them simple, but I had mixed up some pretty pastel colors for some chalk boards, and I couldn't resist adding some to the baskets too.


I really, really want to be an all-white decor-girl because I love the way it looks, but as hard as I try, color always sneaks in and messes with my vision.  After adding color, I sanded them down a little for a more aged look.


Aren't the Easter Tags cute?  Found them on Pinterest, of course! 


Here's another basket I painted and then adorned with ribbon, buttons, and coffee-dyed coffee filters (did you expect anything else?). 

 I also covered a plastic egg with book page scraps...but I think the egg could be removed and the basket can be displayed any time of year.


A close-up of the ribbon and button detail.

I'm hoping that the addition of these Spring baskets make my booth space a little more fun and inviting.  But, just to keep things sassy, I'm going to wait to share pictures of my updated booth for the next couple days. Right now, I have flowers to make!

Thanks for sticking with me through the past couple crazy weeks, I really appreciate it and I'm hoping to make it up to you with some fun projects.  

If you've commented on a post or emailed me - thank you SO much - I really do love hearing from you....but, as you might imagine, I'm really behind on that too.  I sincerely apologize - meeting new friends is one of my favorite parts of blogging and you deserve better!

I hope to party at some of these lovely blogs:

MONDAY:
TUESDAY: 
Domestically Speaking (Paint Projects)
Faded Charm (White Projects)
THURSDAY:


take care -
 

Follow Me on Pinterest

Monday, February 27, 2012

Too Tired...

...to come up with a name for this post. If you choose to read it (enter at your own risk), you'll see why naming this mess of randomness might be a challenge.

 Staring at my computer screen for the past 10 minutes hasn't managed to inspire me either. hmmm.

(thought I'd add a little swirl for a moment of visual randomness)

So anyway, it's been a busy couple days of teething/cranky toddlers, crafting, closet-demolition-ing, wreath making, treasure-hunting, and booth remodeling (actually, that's scheduled for tomorrow). 

I'm covered in chalkboard paint and pastel craft paint - and I have all kinds of Easter/Spring fun to share as soon as I can take some pictures.  I've never really done any crafting for Easter or Spring before - but wanted to add a little color and fun to my booth space and Etsy shop - it's been a lot of fun, especially since white latex or chalkboard paint are usually the only "colors" I use.


The shop that sells my wreaths featured them on their blog..which was a surprise to me.  Since the rest of my family is asleep right now, I'm sharing my happy little moment with you...lucky you, right? 

Here are a couple pictures from the post


Tomorrow is another busy-bee day, but hopefully, I'll be able to share some auction finds, my booth update, and some of the Spring/Easter crafts I've been working on with you in the next couple days.


By the way....anyone know how to make rolled paper flowers and looking for a hobby?  I have so many wreath ideas that I want to try, but not enough time to make all of the flowers.  If only I could safely handle a glue gun in my sleep...I could work around-the-clock!

If you've made it this far, I commend you....you are a fantastic friend. thank you so much.

Since I'm being random...anyone try dying coffee filters or making a wreath yet? If so, PLEASE let me know.

Now...off . to . bed.


take care -
 

Follow Me on Pinterest

Friday, February 24, 2012

Hideous Blue Carpet

No, I haven't run off and joined the circus...

Nothing as adventurous as that.  I'm working on a large order of  wreaths for a wedding in California - the bride is using them as centerpieces for her reception.

Between the wreaths, keeping up with my Etsy Shop and antique shop booth and wrangling my lively toddlers...oh, and feeding my Pinterest addiction, I've been an absent blogger.

Oh, and we've been doing a little demo 'round the house. Have you noticed that I barely EVER show pictures of my house? There's a reason..hideous.blue.carpet (among other things)

Here's a little glimpse of said hideous blue carpet...
(This is my husband setting up Max's train set on Christmas Eve)
If you're wondering what the lovely black edge on the fireplace is, it's plumbing insulation that we used to baby proof...we have a 2-sided fireplace, so this is much less expensive (although, not as attractive) than the official childproofing stuff.  

Okay, back on topic...hideous.blue.carpet.  Well, the carpet became even more hideous after several months of leaky sippy cups, crafting, and my husband's "run-in" with the table saw.

Being that we have A LOT of hideous blue carpet to replace, and Bryan is on disability due to his hand until possibly the end of April, we had to be pretty thrifty with our floor shopping.

So...when I found this Mountain Pine Laminate with padding at Lumber Liquidators for $1.49 per sq ft, I was on it like white on rice.


If you really like it, it's on sale now for $1.19.  I love it...the price and the floor.  Laminate is ideal for us because the kids ride everything but motorized vehicles through our house.  It looks so real, you have to touch it to know it's not.

We were so excited about the new floor that we forgot to take a picture before ripping out the old carpet.  It's quite unfortunate, as one can not truly appreciate the "after" without a good picture of the "before".

You can see a little of the blue carpet in the middle of the picture.  

Oh, and see the bump out on the right of the fireplace, there's a Christmas tree inside.  The previous homeowner passed away and her kids had no idea she had stored a Christmas tree next to the fireplace.  They didn't offer to move it.

Max is obsessive about everything being picked up....except his toys. For 2 years old, he's actually pretty helpful with holding the dustpan...sweeping is another story.

Floor installation...doing well with 1 hand. Until...

I reminded my husband that I wanted the closet removed. The doors with the big yellow X is was a coat closet, but it just made our already-enormous-2-sided fireplace even more massive looking...so, it has to go...

...in the process of getting rid of the closet, but then my husband wasn't sure if it was a load bearing wall...

...so here's how it looks today...
...uhh, what's that you say? It's the same picture? Why yes, yes it is. 

And stop looking at our brick planter with the fake ivy...I know it's not cute.  There are little rocks under the ivy, so I've left the ivy to protect the rocks from being consumed by small children.

Not much of a transformation, I admit, but it's moving in the right direction.  
I just wanted to show you what I've been up to since I've been MIA lately.

Hope you have a great weekend.

take care -
 

Follow Me on Pinterest

Saturday, February 18, 2012

Stunning Paper Rose Wreath Template

Handmade Paper Flower Wreath
Isn't this paper flower wreath by Ellinee stunning?  If I didn't have 15.5 (seriously) other wreaths to make right now, I'd SO be giving this one a try.

Even more fantastic...they give you a FREE template to print to make the flowers (as well as free templates for some of their other gorgeous items as well).  AMAZING.  Oh, wait, there's more!  Ellinee also gives a photo tutorial to show how to construct this dreamy-confection-for-the-eyes.
I don't know about you, but the wonderful-ness of this rivals Christmas morning for me!

If you decide to give this one a try, please, please, please let me know how it goes...I'm desperate to find out if this is really as amazing as it looks!  (I imagine it's quite time consuming, so you might consider grabbing a couple of your kids, friends, people off the street, etc. to help?)

Remember when my dreams of crafting glory were crushed by Martha...I  hope that this doesn't also end in a frustrated paper-folding melt-down.

Elegant Paper Rose

If I have a moment (you know, after the 15.5 wreaths...I'm writing this post at 6am on a Saturday...and my 2 toddlers are both still sleeping...I must have lost my freakin' mind!), I'm planning to do a little partying...


MONDAY:
TUESDAY: 
Domestically Speaking (Paint Projects)
Faded Charm (White Projects)
THURSDAY:


(I didn't receive anything for this post, like all of the blogs and sites I mention on Salvaged Whimsy, it's just something fabulous that I thought you might find to be fabulous too.)

Back to bed for me....hopefully....unless Emme decides to be an early-bird again this morning.

Have a beautiful weekend.

take care -
 
 
Follow Me on Pinterest

Wednesday, February 15, 2012

Tutorial: Rolled Paper Flowers

Now that you've had a couple days to dye your coffee filters, I imagine that your crafty little fingers are itching for more coffee-filter-fun...


First, plug in your glue gun and make sure you have plenty of glue sticks.

Grab your favorite pair of scissors, and a big pile of your lovely coffee filters (or any paper of your choice)

Since coffee filters are so thin, I usually layer and roll 2-3 at a time.  For this flower, I'm using 2 filters.

If you are using something other than coffee filters, you'll want to cut out a circle.  If you're not a great circle-cutter, you may want to trace one before cutting, as it makes rolling the flowers a bit easier.

Next, cut a spiral out of your coffee filter. (Drawing it out first may make this step easier)

and we're cutting...


This is what your final product should resemble.  When you get to the end of the spiral, there will be a small circle left that's about the size of a penny.
The place where you started cutting will also be where you start rolling the flower

Starting where you started cutting, roll your filter like you'd roll up a area rug.  This will be the center of the flower and you want it as tight as possible.  The outer edge of the coffee filter will become the top of your flower.

  I had trouble getting flowers started with my big fingers, so I found it easier to fold down a tab as shown above to have more to hold on to.  

Notice once I fold over the tab, how tightly I start the center.

Once you get the center stiff enough that you can hold the top and bottom between 2 fingers, it makes it a lot easier to roll this way.
As you near the end of the filter, make sure to keep the bottom of the flower tight, as the top will start to get loose.

Finished rolling.  If your flower seems too tight and you want to look a little looser, cup it between your 2 hands and shake it, this will help loosen it up some without it falling apart.

This is where that little tab I mentioned above comes in handy...if your center becomes too loose, you can use the tab to tighten the center of the flower without starting over again.

If you are using book pages, scrapbook paper, cardstock, etc, you'll take some pressure off the flower and it will loosen itself.  Be careful not to let go of it too much, or your flower may fall apart.

Once you get to the end, you'll have the circle tabs sticking out at the bottom of the flower.

On the bottom of the flower and around the edge of the bottom, you want to glob on a whole bunch of hot glue.

Then, fold the circle tabs over the glue bottom of the flower.  If you are using more than one filter, make sure to glue each layer of the circle tab...

See the 2 tabs where it's labeled "bottom of flower"...

...that's where you need more glue.

And here's your flower.  If you have any petals that look out of place...don't be afraid to trim where needed.

Easy, right?


            So, now all you need to do is start rolling,
and rolling,

and just when you think you have enough...
....roll a couple more.

 The pile of flowers above made half of the 12" wreath pictured below.


Still with me?? I think some of my instructions might be confusing?
If so, you might try the source I originally used when learning how to make these flowers.

You might also want to check out my original post showing how I make the flowers into a wreath.

Please don't hesitate to let me know if you have any questions, and I'll happily help in any way I can.

Finally - if you make a wreath, I'd love to see it and feature it here at Salvaged Whimsy...

Sharing at these parties:
MONDAY:
TUESDAY: 
Domestically Speaking (Paint Projects)
Faded Charm (White Projects)
THURSDAY:

take care - 
Follow Me on Pinterest
Related Posts Plugin for WordPress, Blogger...