All About Salvaged Whimsy...

Wednesday, November 30, 2011

Whimsical Wednesday - Tutorial: Vintage Chalkboard Ornaments and Gift Tags

These are a little time consuming (hence the very delayed Whimsical Wednesday post), but they are so easy...they'd work as either an ornament or as gift tags.  I made some using the little wood cut-outs from Michael's this weekend, but I forgot to take pictures before I dropped them off at my booth (which is almost an hour from our house).  I improvised to make them again today, so I could share them with you.

They are so cheap and easy..and there are so many ways to customize them to your taste.

I started by painting some thick water-color paper with 2 coats of chalkboard paint, and set it aside to dry.


I then visited one of my favorite blogs, The Graphic's Fairy, to find some great vintage clip art.

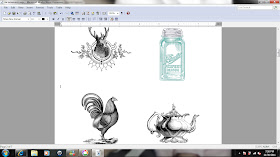
  I copied and pasted my chosen pictures into a word doc, re-sized them, and made sure I left enough room between them to cut them out. Then I printed them on white card stock and cut them out. 

Then, I tore a couple pages out of an old music book, and traced circles onto them using the lid from an icing container.  I cut them out - stacking the paper so I could cut several at once - and glued the card stock cutouts to them. (I used a glue stick, and laid a book on them to dry.)

Once the chalkboard paper was dry, I used the same icing lid to trace circles onto the backside of the paper and cut them out.

I attached the chalkboard paper to the music paper.

      
 I then took some fine grit sand paper and sanded lightly, paying extra attention to the edges.  See the difference between the first and second image?

Here's another:
   
Before sanding....

...and after sanding.

Then, I made a mixture of stain, black paint, and  a clear glaze. I blotted a little bit onto a rag, and rubbed it onto the image, again paying extra attention to the edges.

I liked the way the colored images turned out better than the black and white.  On the black and white ones, I went a lot lighter with the stain mixture, mainly just rubbing it around the edges of the circle.


Here are a couple more of the finished product:


I also made a couple that I just glued the card stock directly to the chalkboard paper: 
I the Ball jars, I opted to use wire over twine, to sort of emulate the top of a real canning jar.
  
Again, all of these images are from Karen at The Graphic's Fairy.

 And, here's how the backs look:
  

I'm thinking about adding some glitter to the picture side...so they sparkle on the tree. Not sure though...
I also thought attaching some little charms or words might be cute...but I ran out of my crafting mojo for today.
Have you made any fun ornaments yet this year?  I'd love to see them if you have time to share. 
Hope you're having a great week...sharing this at these link parties:

MONDAY:

TUESDAY: 
Domestically Speaking (Paint Projects)
Faded Charm (White Projects)
THURSDAY:

FRIDAY:

 take care -


Follow Me on Pinterest

Tuesday, November 29, 2011

1st OFFICIAL Salvaged Whimsy Giveaway - 100 Followers

I'm back with the details for my very 1st giveaway in celebration of reaching 100+ followers at Salvaged Whimsy. YAY!!
I'm so thankful for each and every one of you.
I know the suspense must be killing you, so here we go...

1.  Custom Hand-Painted Sign on Reclaimed Barn Wood:

here are a couple examples of a few I've done:

...you may choose the words, color, font you'd like.

2.  A Vintage "Wayne Feeds" 100lbs Feed Bag:

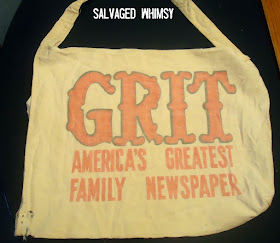
3.  A Vintage "Grit" Newspaper Carrier Bag:
Isn't the font great?  Love it.  I think it would make a great pillow...but I can't sew. The one side has a small tear on the bottom.
(Opposite side of the bag) - the one edge of the bag opens so the paper carrier could grab the paper more easily.

And last...but DEFINITELY not least....you didn't think I'd leave out a coffee filter project from my very first give away???  

4.  Your Choice of a Paper Wreath:


...or I can customize one to your specifications.

This giveaway is open to all of my lovely followers (so if you aren't one yet, please consider becoming one in order to be eligible for my very 1st Giveaway!). 

Please comment on this post by this Saturday, Dec 3, at Midnight (EST), and I'll choose a winner at random (as long as you are a follower of Salvaged Whimsy). The winner will be announced on Sunday, Dec 4th. 

Thanks again -
take care -

Follow Me on Pinterest

102 Followers...Thanks to Each of You!

What a wonderful surprise to wake up to this morning....not that I actually "woke up" as I never really "fell asleep" in the truest sense of the words.  Ahh, motherhood, such a blessing for the caffeinated beverage industry! :). 

Seriously, I can't thank each of you enough for taking the time to visit my blog and your choice to become a follower.  It really means more to me than I can express to you.  It's so wonderful to have a group of such beautiful, talented people to share ideas with every day....I've never met a group of kinder, giving, accepting people in all of my life.  Thank you.

I have so much more to share with you...like getting rid of my red kitchen counter tops and the blue carpet that covers nearly my entire house.  Of course, there are surely more trunk, drawer, and coffee filter projects to come!  Plus, I have a whole 2.5 car garage FILLED with furniture (just ask my husband...he's about to have a nervous breakdown over the state of our garage) that desperately needs attention.

Then there's the awesome farm table that I promised to share with you over a week ago...there were some unexpected.....ahhhh, delays (aka: hosting Thanksgiving)

I'll have my giveaway post up before the end of the day, so please check back in the next couple days to enter!

Thanks again to each and every one of you!

take care -


Follow Me on Pinterest

Sunday, November 27, 2011

Tutorial: Rolled Paper Flower Wreath

This project was listed at the Tip Junkie's Handmade Gifts Blog - A great resource if you're in need some unique gift ideas.  Thanks to Laurie (aka The Tip Junkie) for choosing to feature my wreath project.

I had a couple requests for a tutorial on how to make the paper flower wreaths seen in my Christmas Coffee Filter Decor post.
  

After reading through several tutorials, I used a the one I found here at Jones Design Company's blog:


Make sure you block out a generous portion of time before visiting this blog, as it is AMAZING!

This tutorial is for the wreath above.  So, rather than scrapbook paper, I used....ahem....COFFEE FILTERS (what else, right??) to make the white flowers shown in the wreath above.  I cut 3-4 coffee filters at once, and rolled them as shown in the tutorial.  (Instead of rolling a single piece of paper at a time, I rolled 3-5 at once to get a fuller looking flower.)

JDC suggests cutting the paper with wavy cuts like this:
spiral 2


...but I tried it that way, and I preferred the way it looked with more straight, even cuts.  Also, I tried to keep the width of the cuts as uniform all the way to the center.  Some tutorials I've read suggest making the width larger as you get closer to the center.
Try to get the very beginning of the roll as tight as possible, which is difficult, especially with the coffee filter paper.   If you've not made rolled flowers before, you might try a single piece of thicker paper before the multi-layered coffee filters.

Here I used single book pages for each flower.   The circles for these flowers were about 4"-5" across.

I used hot glue to fasten my flowers (I'm sure you would figure this out, but for the multi-layered coffee filter flowers, you'll want to put a dab of glue between each layer at the end to keep everything in place). 

So, once you have a big pile of paper flowers, it's time to make the wreath.  I used a styrofoam plate as my "wreath form," by cutting the flat center portion out, but leaving the curved edges.  Again, does not need to be perfect.

Start by placing the tissue paper flowers around the wreath as symmetrically as possible, making sure they are all facing up (not off to the side).  Then use the book paper flowers to fill in the holes, especially around the center and outer edges.

Finally, for the leaves, use the method suggested by JDC:
glue leaf

I made my leaves using brown paper cardstock and painted them with gold craft paint.

Tuck the leaves in bare spots...making sure they are evenly distributed.

Finally, attatch a piece of fishing line to the back with hot glue.  If you are giving as a gift or want to hide the plate, glue a piece of card stock to the back and trim to the size of the wreath.

And there you go...a practically FREE wreath...

If you like how this turned out, you might want to check out my pleated wreath, too.

Now, here's what NOT to do:
This is the first wreath I did using white printer paper before I tried the coffee filter paper.  I cut the flowers making them bigger as I went toward the end of the spiral...which as you can see above, made the outer edges very tall, and so they were hard to blend in with the other flowers.  I went back and trimmed the flowers to make them blend together better.  Also, notice how they are all pointing in different directions...looks a little funky.

So, obviously, there are all types of variations you can try...here are a couple of the different ones I did: 


Once you get the hang of these, you can make them while watching tv, riding in the car (not driving), etc...I'd make a pile and then hot glue them later.
You could spray paint these, dye the coffee filters, try different edges on the flowers, try various types and colors of paper, but I don't have to tell you this - you are the most creative people I've ever met!!
I'd love to see what YOU come up with!!! If you leave a comment letting me know that you've made one, I'll be sure to come over and check it out!

If you like these, but don't have time to make one yourself, I have them for sale in my Etsy shop.

I've linked this to these parties:

MONDAY:
TUESDAY: 
Domestically Speaking (Paint Projects)
Faded Charm (White Projects)

THURSDAY:

FRIDAY:

take care -
 

Follow Me on Pinterest