My goal is to have Max in his own room sometime before he enters high school. At the rate his room redo is going....I may need to up that to college. He's outgrown the crib-- though our babies were born at a" normal" size (Max 7.7lbs and Emme 8.7lbs) - they quickly zoomed up the growth charts and are both in the 97%+ percentile for height and weight. So....needless to say, Max just skipped over the toddler bed (bummer, because IKEA has some
really cute ones!) and we're putting him in a full-sized bed.
His new room is the only one in the house (THANK GOODNESS!) that has (or, had) wallpaper, and I dreaded removing it. I thought we'd surely have to re-drywall. Fortunately, the previous owners painted with semi-gloss paint before they papered, so removing it only took a day. Still, not something I want to do again in the near future. This experience has also made me rethink my plan to paper my dining room.

- Just starting to strip wallpaper
Unfortunately, the shiny, burgundy, puffy curtains (stuffed with plastic grocery bags for extra "puff") do not fit in with the overall "look" that I'm going for....hopefully, I can find another place to use them (like in my fireplace). The blue carpet will also be leaving us one day...the sooner, the better.

- Max "helping" me strip wall paper
[caption id="" align="aligncenter" width="300" caption="Mid-strip....a lot of the backing had to be removed with water and a putty knife."]

[/caption]
Once I finished with the paper-removal, I washed the walls down twice with hot soapy water. The 2 walls you can't see are painted navy blue with just the border around the top. Between the navy paint, the dark wood and any wall paper glue remnants, I decided I'd have to prime the walls. (I am very impatient and tend to cut corners when possible...bad me)
So now the fun part finally begins.
Max loves cars, trucks, anything on wheels. He loves the Cars movie, but I'm not huge on character stuff - so while I still have some control over things, I decided on a general car theme.
And then this quilt from Target:
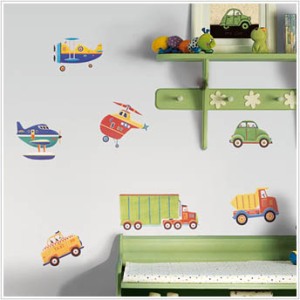
I don't believe that Target is making this line any longer, it's currently on clearance at my local Target - I think I paid about $50 for the quilt and 2 shams. I found that the Roommates decals I liked were also sold at Target....so yippee for easy shopping!! They also had a line of decals available that went with this design, which were also on clearance.
So, I painted the room a lighter shade of the blue in the quilt...

Already much better than the "before."
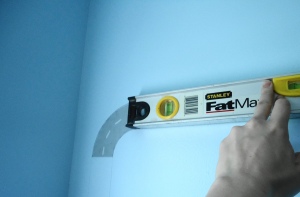
The next step was adding the "road" border. The Target decals came with some road pieces, so I used a level and the "road curve" from the Target set. It just so happened that the level I used was almost the same width as the curved road decal (approx 2" wide). Basically, I used the level for all horizontal and vertical roads, and for all curves, circles, I traced the curved road decal.

The decal I traced is on the left, and I traced both sides of the level for the straight parts of the "road".
Since I painted the walls with a satin finish, I chose to do the road in a matte finish - I just mixed some white and black paint to make a light gray color. I had planned to tape off the edges of the road to make the edges sharp, but being my impatient self, I just took a 1" brush and went to it. It probably would have been a little easier in the corners and curves to use a smaller brush, but I didn't feel like looking for one in our mess of unpacked boxes.
[caption id="attachment_252" align="aligncenter" width="300" caption="Bed "headboard" - before painting road dashes "]

[/caption]
Bryan and I couldn't find a headboard that we liked that we also felt wasn't dangerous or could be used a climbing apparatus...so I decided to paint one on the wall. Obviously (and hopefully it looks like), Max's name.
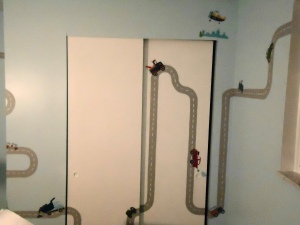
Once I finished painting the road, I did the dashes. I thought and thought about a consistent way of doing this that wouldn't take weeks...I even bought yellow duct tape with the thought of cutting dashes and sticking them onto the wall...but I was worried they would peel off and Emme would try to eat them. I tried tracing over the decal, but that also was very time-consuming and didn't really work. Finally, at around 10pm, I decided to just go for it and freehand. I practiced a couple different strokes trying to find one I could easily repeat, then wiped off with a wet rag and started with my chosen "method". The dashes aren't perfect by any means...but it only took about 45 mins to do it this way, and I thought the imperfection gave it a more "cartoonish" look.
[caption id="attachment_255" align="aligncenter" width="300" caption=""Road" with dashes"]

[/caption]
Then I added the decals. The instructions say to allow the paint to cure for several weeks before applying the decals....but that didn't really work with my schedule, so again, I went for it and started sticking....this was fun!!
[caption id="attachment_245" align="aligncenter" width="300" caption="Closet doors"]

[/caption]
[caption id="attachment_253" align="aligncenter" width="300" caption="Max "headboard""]

[/caption]
So, the walls are done. Now I need to add all of the finishing touches (like a bed would be nice)....and I'll post the results as soon as I can.
Any fun kid room projects in your future? Please share ! (I still have a girl's room to do!!)
I've linked this post to:
 Blue Cricket Design
Thanks -
e
 [/caption]
 The decal I traced is on the left, and I traced both sides of the level for the straight parts of the "road".
 [/caption]
 [/caption]


Love it! I miss those days of decorating my kid's rooms. It is so much fun. Be prepared for wheel marks on the wall. ;-)
ReplyDeleteThanks...the wheel mark thing occurred to me after I started!
ReplyDeleteOh my gosh, what an adorable idea! My boys would have loved walls like that when they were little. Sniff. Magic Eraser should get the wheel marks out easily! Have a great weekend! Susan
ReplyDeleteThis is such a great idea! I love your style of writing - it sounds like my life so I end up laughing out loud!
ReplyDeleteThanks so much - I'm glad my tone comes accross that way - so I really appreciate the feedback.
ReplyDeleteOh My Gosh! Great job! I love the road all around the room such a great decor idea! I have a boy named Max as well and this is such a great idea I may have to borrow it for his big boy room... which wont be for a year or two(he was only born this August...)
ReplyDeleteMy Max is a summer baby too...end of July. Congrats on your new baby. Is your Max named after anyone? Is it short for anything? My Max is named after my grandfather, and it's not short for anything. When we first chose the name, I was a little hesitant because it was a pretty uncommon name (other than grandpas)...and now it's everywhere!! Thanks for your comments...we picked a car theme because we are trying to entice him into wanting to sleep in his own room. Still trying. Luckily, his little sister is Miss Independent, so she loves sleeping in her own room, or we'd need a bigger bed!
ReplyDeleteTake care and enjoy your little Max!
Erin
Some genuinely prime posts on this website , saved to my bookmarks .
ReplyDeleteImpressive!! I bet you will keep up the amazing work.
ReplyDelete